An electric torque wrench is a gearbox that is connected to an electric motor. This gearbox is designed in such a way that it absorbs the torque, allowing the user to operate the wrench with minimal effort. These are typically used when there is no need for torque strength accuracy being used on the nut or bolt, or when a very stubborn nut needs to be removed.


Operation of Electric Torque Wrench
General
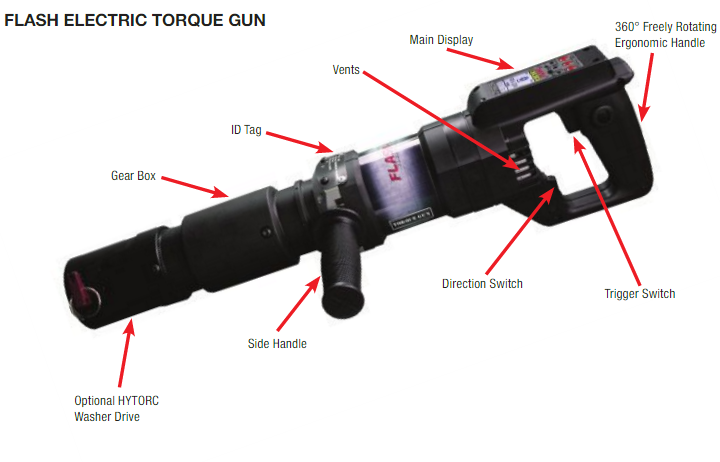
Each electric torque gun is supplied completely assembled and ready for use. A side handle is supplied for better hold and grip during operation.
Setup
Reaction Arm
Each electric torque gun is equipped with a universal reaction arm. The reaction arm is used to absorb and counteract any opposing forces created by the operation of the torque gun. Use the appropriate size reaction arm or HYTORC Washer based on your application.
Power
The FLASH GUN can operate at 110V or 220V AC based on the model configuration. Ensure proper voltage is present at the power outlet and insert the power chord into the nearest 110V (black cord) or 220V (yellow cord) outlet. Upon power up, the FLASH GUN will initialize and show the main display screen.
Basic Operation
At Start up the FLASH GUN is ready to operate at the initial or the last Torque, Angle and Release Angle settings. If these settings are correct and when ready to tighten a fastener, place the gun on the application and press the trigger until the reaction arm firmly makes contact with the reaction point. Press and hold the trigger until the gun comes to a complete stop.
 While torquing, the YELLOW LED will light up showing BUSY. When done, the torque gun will beep once and the GREEN LED will turn ON. In case of error, the torque gun will beep 4 times and the RED LED will be ON. If failed, an error message will be shown on the display screen. If Release angle is set, the gun will automatically run backwards to the specified angle to release windup from reaction torque.
To change or set Torque, Angle and Release Angle see the “Setting Torque and Angle” section.
To loosen, set the direction switch to ‘L’. See figure 11 for direction switch operation. The torque setting will be automatically set to the maximum allowed
torque for the particular type of gun, i.e. for FG3 Series FLASH-3 GUNS, the max torque is 3150 ft. lbs. Press and hold the power trigger switch while the socket turns and loosens the nut. In reverse direction, the torque gun is set to maximum torque in order to loosen the nut. Use extreme caution when running in this mode. The FLASH GUN can operate on both left hand and right hand threads. See the “Additional Options” section for changing to/from left hand or right hand thread modes.
Basic Function Descriptions
Torque: Allows the operator to enter the target torque that the gun will seek when the trigger is pulled and held.
Angle: If an angle setting is above “0” the gun will add this angle of rotation to a completed torque operation using the maximum output of the unit. If the FLASH GUN reaches its maximum torque before completing the angle then it will stop with an error: “Angle Failure: Out of Torque Range”
Release Angle: After completing an operation, the gun will automatically run backwards to the specified angle to release windup from reaction torque.
Direction Switch
1. (R) Tighten 2. (L) Loosen
Setting Torque and Angle
The main screen shows three settings for Torque, Angle and Release Angle. The three settings are toggled with the left most soft button. Increase and decrease each value by using the center and right-most soft buttons.
 Follow these steps to set the torque and angle:
1. Set the direction switch to ‘R’ to tighten. See figure 11 for directional switch. 2. Set the desired torque by pressing the soft push buttons corresponding to the up/down arrow key indicators. When desired torque is displayed, press the left-most soft button corresponding
to the “Right Arrow” to go to the next screen for setting the angle. 3. Set the desired angle by pressing the soft buttons corresponding to the up/down arrow key indicators. When desired angle is displayed, press left-most soft button corresponding to the “Right Arrow” to go to the next screen for setting the release angle. 4. Set the desired release angle by pressing the soft buttons corresponding to the up/down arrow key indicators. When desired release angle is displayed, press left-most soft button corresponding to the “Right Arrow” to go back to main screen with the torque setting.
TORQUE GUN OPERATION

Tightening
1. Set the direction switch to ‘R’ to tighten. See figure 11 for directional switch. 2. Set the desired torque value as described in “Setting Torque and Angle” section. 3. Make sure the torque gun and the reaction arm are in position for tightening. 4. Ensure the reaction arm is squarely against a solid reaction point. 5. Press and hold the power trigger switch while the socket turns. 6. When specified torque is reached, the FLASH GUN will stop, BEEP once and the Green LED
will turn ON.
7. If Release angle is set, the gun will automatically run backwards to the specified angle to release windup from reaction torque.
8. If the FLASH GUN fails to set the torque properly, it will BEEP 4 times and the Red LED turn ON while also showing the error on the display. In case of error, try again by repeating process from Step 3. If error continues, STOP and check for any abnormalities with the FLASH GUN or the nut/bolt being tightened.
9. Release the power trigger switch.
10. If the trigger is released prematurely, the display will show an error and the Red LED will turn ON. In this case, restart tightening process from step 3.
11. The nut is now tight at the current torque setting. Proceed to the next nut.
Tightening with Angle
1. Set the direction switch to ‘R’ to tighten. See figure 11 for directional switch. 2. Set the desired pre-torque and angle values as described in the “Setting Torque and Angle”
section. 3. Follow the steps 3 to 5 for Tightening above. 4. When preset torque is reached, the FLASH GUN will turn the nut in degrees set by the angle. 5. When the specified angle is set, the gun will stop, BEEP once and the Green LED will turn ON.
Memory Options
By pressing the left-most button and holding it, the memory menu will be displayed. Figure 13 shows the memory options menu. On this menu, you can save the current settings, or load previously stored settings.
There are 8 memory locations for saving and loading both torque and angle settings. Use the up and down arrow keys to choose from the highlighted numbered memory locations.
 Press the left-most button to select the current memory location. Press the corresponding down arrow key button to save the current settings to the selected memory location. To load the contents of the memory location, press the corresponding up arrow key button. To return to main menu without saving/loading, press the left-most button.

Application
It is ideal for Infrastructure and Power generation Industries.

The specifications are incredible of electric Wrench. I really appreciate your post and you explain each and every point very well.
ReplyDeleteMontanez
Thanks
ReplyDeleteThere are other torque wrench tools like the click type that can be preset to get the desired torque. This tool makes a sound when the clutch slips on achieving the desired torque. useful link
ReplyDeleteThere are electronic wrenches that have a digital display instead of an analog gauge. There are also hydraulic torque wrenches that are capable of applying a large amount of force through the use of hydraulics. this site
ReplyDeleteWhen tightening a bolt to the proper torque, it is essential that your hand which is pulling the wrench is cantered on the handle of the wrench. Having it too close or far from the socket actually affects the ultimate torque value you are tightening to. visit the site
ReplyDeleteThis is a special type of wrench that has a special type of wrench that has an indicator to direct the user when to stop the tightening process after the correct torque has been successfully applied. There are many types of wrench tools that have certain specifications and are used for varied projects. click to explore
ReplyDeleteIt is an informative post. There are many brands like Fluke, Dewalt, UnI-T etc which provides Torque Wrench
ReplyDeleteHi..
ReplyDeleteI appreciate your Informative post and thanks for sharing.
Torque Tester–Digital