Showing posts with label mechanical. Show all posts

Monday, 28 October 2024

How to Choose a Hydraulic Torque Wrench


 Hydraulic torque wrenches are the heavy hitters in the bolting world, delivering immense torque for tackling the most demanding industrial applications. From wind turbine construction to pipeline assembly, these powerful tools ensure the precise and secure fastening of critical joints. But with a vast array of options available, selecting the right hydraulic torque wrench for your needs can feel overwhelming. Worry not, for this comprehensive guide will equip you with the knowledge to make an informed decision.

Understanding Hydraulic Torque Wrenches:

Unlike their manual counterparts, hydraulic torque wrenches utilize pressurized fluid to generate the necessary force for tightening or loosening bolts. This translates to significantly higher torque output compared to manual wrenches, making them ideal for large, high-strength bolts.

Here are some key components of a hydraulic torque wrench system:

  • Hydraulic Power Unit: This acts as the heart of the system, generating the pressurized fluid used by the wrench. Power units can be electric, engine-powered, or hand-operated depending on your needs.
  • Hydraulic Hose: This flexible line transmits the pressurized fluid from the power unit to the wrench.
  • Hydraulic Torque Wrench: This is the workhorse, responsible for converting the hydraulic pressure into torque to tighten or loosen the bolt.

Factors to Consider When Choosing a Hydraulic Torque Wrench:

Now, let's delve into the critical factors that will influence your choice of hydraulic torque wrench:

  • Torque Requirement: This is the most crucial consideration. Identify the maximum torque needed for the specific application. Consulting your project specifications or fastener manufacturer's recommendations is essential to determine the required torque range.
  • Application: Different applications have unique demands. Consider factors like access limitations, required speed, and portability. For example, wind turbine maintenance often requires low-profile wrenches for confined spaces.
  • Frequency of Use: If you'll be using the wrench frequently, consider investing in a more durable model built for high-volume usage.
  • Hydraulic Compatibility: Ensure the wrench and power unit operate at compatible pressure ranges.
  • Accuracy Requirements: Hydraulic torque wrenches typically offer high accuracy, but some applications might demand even stricter precision. Look for wrenches with certified accuracy levels to meet your needs.
  • Safety Features: Hydraulic wrenches involve pressurized systems. Opt for models with overload protection and pressure release valves for enhanced safety.
  • Accessories: Hydraulic wrenches often require additional accessories like cassettes (drive heads for different size bolts), reaction arms (to counter the torque reaction), and calibration equipment. Consider the availability and cost of these necessary add-ons.
  • Budget: Hydraulic torque wrenches can range significantly in price depending on their capabilities and features. Determine your budget beforehand to narrow down your options.

Beyond the Basics: Key Features to Explore:

  • Cassette Drive: Hydraulic wrenches utilize cassettes to accommodate various bolt sizes. Choose a system that offers a wide range of cassettes to handle diverse applications.
  • Single vs. Double Acting: Single-acting wrenches apply torque only in one direction, while double-acting wrenches can both tighten and loosen bolts. Consider the versatility of a double-acting wrench if your application requires both tightening and loosening operations.
  • Digital Readouts: Modern wrenches often come equipped with digital readouts for real-time torque monitoring, enhancing accuracy and control.
  • Data Logging Capabilities: Advanced models can even record and store torque data for documentation and quality control purposes.

Investing in the Right Tool:

A hydraulic torque wrench is a valuable investment, ensuring the safe and precise completion of critical bolting tasks. By carefully considering the factors outlined above and exploring the available options, you can select the ideal wrench for your specific needs. Remember, a qualified hydraulic tool supplier can provide valuable guidance and assist in choosing the perfect tool for your application.

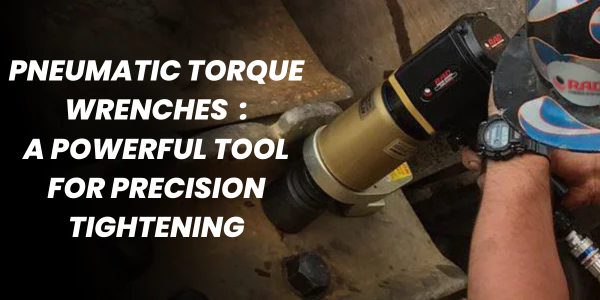
Pneumatic Torque Wrenches: A Powerful Tool for Precision Tightening


Pneumatic torque wrenches are essential tools in industries where precise and efficient tightening of bolts is critical. These wrenches utilize compressed air as their power source, providing a reliable and adjustable means of applying torque to bolts.

How Pneumatic Torque Wrenches Work

A pneumatic torque wrench consists of a pneumatic motor, a gear reduction system, and a torque reaction mechanism. When compressed air is supplied to the motor, it rotates a gear train that drives a reaction arm. The reaction arm is connected to a torque sensor, which measures the force exerted on the bolt. Once the desired torque setting is reached, the wrench automatically shuts off, preventing over-tightening.

Key Advantages of Pneumatic Torque Wrenches

  • High Power Output: Pneumatic torque wrenches can deliver significant torque, making them suitable for heavy-duty applications.
  • Versatility: They can be used in various industries, including automotive, aerospace, manufacturing, and construction.
  • Precision: With proper calibration, pneumatic torque wrenches can achieve high levels of accuracy in torque application.
  • Efficiency: They are fast and efficient, reducing assembly time and improving productivity.
  • Durability: Pneumatic wrenches are generally durable and reliable, with long service life.

Applications of Pneumatic Torque Wrenches

  • Automotive Assembly: Tightening wheel nuts, engine bolts, and other critical components.
  • Aerospace Manufacturing: Assembling aircraft structures and components.
  • Industrial Machinery: Installing and maintaining machinery components.
  • Construction: Securing structural components and equipment.

Choosing the Right Pneumatic Torque Wrench

When selecting a pneumatic torque wrench, consider the following factors:

  • Torque Range: Choose a wrench with a torque range that suits your specific applications.
  • Accuracy: Ensure the wrench has the required accuracy level for your tasks.
  • Air Consumption: Consider the air consumption rate to determine if your air compressor can provide sufficient supply.
  • Ergonomics: Choose a wrench with a comfortable grip and ergonomic design for operator comfort.

Safety Considerations

  • Proper Training: Operators should be trained in the safe and proper use of pneumatic torque wrenches.
  • Regular Maintenance: Regular maintenance, including lubrication and calibration, is essential for optimal performance and safety.
  • Safety Equipment: Wear appropriate safety equipment, such as safety glasses and gloves, when using pneumatic torque wrenches.

Pneumatic torque wrenches are indispensable tools for industries that require precise and efficient bolt tightening. By understanding their operation, advantages, and applications, you can select the right wrench for your specific needs and ensure safe and reliable performance.

Friday, 14 October 2016

3 way to Tension the Load

What is Tensioning?

 Processing Re-write Suggestions Done (Unique Article) Tensioning is that the direct axial stretching of the bolt to attain preload. Inaccuracies created through friction square measure eliminated. Massive mechanical effort to form torque is replaced with straight forward hydraulic pressure. the same load
can be applied by tensioning multiple studs at the same time.


Tensioning needs longer bolts, and a seats on the assembly around the nut. Tensioning will be done victimisation clastic Bolt Tensioners or Hydraulic buggy.


There are 3 way to Tension:-
 1.Heat
2.Hydraulic Tensioners
3.Mechanical Tensioners

1. Tensioning with Heat:-

Gas Bolt Heater:-

Objective:-
Correctly setup a gas bolt heater
Properly adjust oxy-acetylene flame
Correctly adjust air flow
Safely operate a gas bolt heater


Design:-
Heating causes a bolt to grow in length
Relieves tension on the bolt
Gas Bolt Heater is machined from solid Stainless Steel
A single-bolt heater can be adapted to fit most bolt sizes by changing the heating tube diameter and length

Operation:-
Select a heating tube that is 1/8” smaller than the hole in the bolt and approximately 3” shorter than the depth of the hole
Install heating tube in bolt heater
Use stainless steel reducing bushing for smaller heating tubes
Use high-temperature thread compound
Tighten hand tight
Connect air line to bolt heater
Air pressure should be between 50-100 PSI
Set oxygen pressure to 14 PSI
Set Acetylene pressure to 7 PSI
Use Victor #5-W gas welding tip
Always use check valves
Adjust the flame to obtain a carburizing flame
Carburizing flame has an acetylene feather
Insert bolt heater into the bolt
Purge bolt cavity with air
Turn the air valve off
Insert welding tip into gas bolt heater
Gradually open the air valve approximately 1/8 turn
Observe the color of the heating tube through vent holes in the gas bolt heater
Maintain a cherry red color by adjusting the air valve
More air is cooler
Less air is hotter
For proper operation, a balance of pressure must be maintained between the welding tip and heating chamber back pressure
Excess back pressure will result in welding tip back-fire 
If a back-fire occurs, close the acetylene valve, remove the welding tip from the bolt heater, purge the bolt cavity with air, and restart the heating process

PRO’S:
Minimum Muscle

CON’S:
Hot
Slow
Inaccurate
Hard on Studs
Must have hole
Rough on gaskets


2.  Hydraulic Tensioners 


Various type of Hydraulic Tensioners 
1.Top Connect
2.Side Connect
3.Hydraulic Nut

                     Top Connect                                  Side Connect                           Hydraulic Nut    
   
  3.Mechanical Tensioner:-

-Multiple Work
-Takes Forever
-Tiny Load Points
-Cant check Results


SIONERS
HYDRAULIC
VARIOUS TYPE OF  HYDRAULIC TENSIONERS
Heater

Gas Bolt Heater

3 way to Tension the Load

What is Tensioning?
Tensioning is the direct axial stretching of the bolt to attain preload. Inaccuracies created through friction square measure eliminated. Massive mechanical effort to form torque is replaced with straight forward hydraulic pressure. the same load can be applied by tensioning multiple studs at the same time.


Tensioning needs longer bolts, and a seats on the assembly around the nut. Tensioning will be done victimisation clastic Bolt Tensioners or Hydraulic buggy.


There are 3 way to Tension:-


1.Heat
2.Hydraulic Tensioners
3.Mechanical Tensioners

1. Tensioning with Heat:-

Gas Bolt Heater:-

Objective:-
Correctly setup a gas bolt heater
Properly adjust oxy-acetylene flame
Correctly adjust air flow
Safely operate a gas bolt heater


Design:-
Heating causes a bolt to grow in length
Relieves tension on bolt
Gas Bolt Heater is machined from solid Stainless Steel
A single bolt heater can be adapted to fit most bolt sizes by changing the heating tube diameter and length

Operation:-
Select a heating tube that is 1/8” smaller than the hole in the bolt and approximately 3” shorter than the depth of the hole
Install heating tube in bolt heater
Use stainless steel reducing bushing for smaller heating tubes
Use high temperature thread compound
Tighten hand tight
Connect air line to bolt heater
Air pressure should be between 50-100 PSI
Set oxygen pressure to 14 PSI
Set Acetylene pressure to 7 PSI
Use Victor #5-W gas welding tip
Always use check valves
Adjust flame to obtain a carburizing flame
Carburizing flame has an acetylene feather
Insert bolt heater into bolt
Purge bolt cavity with air
Turn air valve off
Insert welding tip into gas bolt heater
Gradually open air valve approximately 1/8 turn
Observe color of heating tube through vent holes in gas bolt heater
Maintain a cherry red color by adjusting air valve
More air is cooler
Less air is hotter
For proper operation a balance of pressure must be maintained between welding tip and heating chamber back pressure
Excess back pressure will result in welding tip back-fire 
If back-fire occurs, close acetylene valve, remove welding tip from bolt heater, purge bolt cavity with air, and restart heating process

PRO’S:
Minimum Muscle

CON’S:
Hot
Slow
Inaccurate
Hard on Studs
Must have hole
Rough on gaskets


2.  Hydraulic Tensioners 


Various type of Hydraulic Tensioners 

1.Top Connect
2.Side Connect
3.Hydraulic Nut

                     Top Connect                                  Side Connect                           Hydraulic Nut    
   
3.Mechanical Tensioner:-

-Multiple Work
-Takes Forever
-Tiny Load Points
-Cant check Results


SIONERS
HYDRAULIC
VARIOUS TYPE OF  HYDRAULIC TENSIONERS
Heater

Gas Bolt Heater

Tuesday, 12 January 2016

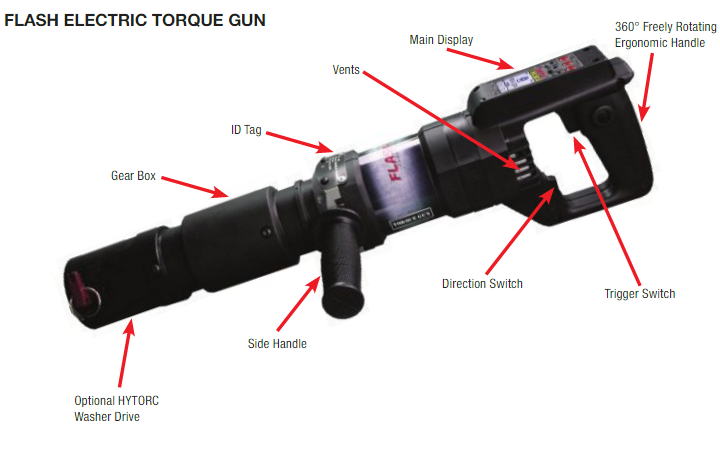
Electric Torque Wrench- Operation & Specification


An electric torque wrench is a gearbox that is connected to an electric motor. This gearbox is designed in such a way that it absorbs the torque, allowing the user to operate the wrench with minimal effort. These are typically used when there is no need for torque strength accuracy being used on the nut or bolt, or when a very stubborn nut needs to be removed.
 The gearboxes can be of ratios of up to 4000:1. and this is adjusted by controlling the voltage. Due to the fact it is powered by electricity, you can find waterproof models for when water is a concern on the jobsite. It is often confused with an impact wrench due to its similar design, but it is in fact a totally different tool, and is even more different from a hydraulic torque wrench. It all comes down to the job and getting the right tool for it.


Operation  of Electric Torque Wrench 

General

Each electric torque gun is supplied completely assembled and ready for use.  A side handle is supplied for better hold and grip during operation.

Setup


Reaction Arm
Each electric torque gun is equipped with a universal reaction arm.  The reaction arm is used to absorb and counteract any opposing forces created by the operation of the torque gun. Use the appropriate size reaction arm or HYTORC Washer based on your application.
Power
The FLASH GUN can operate at 110V or 220V AC based on the model configuration. Ensure proper voltage is present at the power outlet and insert the power chord into the nearest 110V (black cord) or 220V (yellow cord) outlet. Upon power up, the FLASH GUN will initialize and show the main display screen.


Basic Operation

At Start up the FLASH GUN is ready to operate at the initial or the last Torque, Angle and Release Angle settings. If these settings are correct and when ready to tighten a fastener, place the gun on the application and press the trigger until the reaction arm firmly makes contact with the reaction point. Press and hold the trigger until the gun comes to a complete stop.
While torquing, the YELLOW LED will light up showing BUSY. When done, the torque gun will beep once and the GREEN LED will turn ON. In case of error, the torque gun will beep 4 times and the RED LED will be ON. If failed, an error message will be shown on the display screen. If Release angle is set,     the gun will automatically run backwards to the specified angle to release windup from reaction torque.

To change or set Torque, Angle and Release Angle see the “Setting Torque and Angle” section.
To loosen, set the direction switch to ‘L’. See figure 11 for direction switch operation. The torque setting will be automatically set to the maximum allowed
torque for the particular type of gun, i.e. for FG3 Series FLASH-3 GUNS, the max torque is 3150 ft. lbs. Press and hold the power trigger switch while the socket turns and loosens the nut. In reverse direction, the torque gun is set to maximum torque in order to loosen the nut. Use extreme caution when running in this mode. The FLASH GUN can operate on both left hand and right hand threads. See the “Additional Options” section for changing to/from left hand or right hand thread modes.


Basic Function Descriptions

Torque:  Allows the operator to enter the target torque that the gun will seek when the trigger is pulled and held.  
Angle:  If an angle setting is above “0” the gun will add this angle of rotation to a completed torque operation using the maximum output of the unit. If the FLASH GUN reaches its maximum torque before completing the angle then it will stop with an error: “Angle Failure: Out of Torque Range”
Release Angle:  After completing an operation, the gun will automatically run backwards to the specified angle to release windup from reaction torque.
Direction Switch
1. (R) Tighten 2. (L) Loosen


Setting Torque and Angle

The main screen shows three settings for Torque, Angle and Release Angle. The three settings are toggled with the left most soft button. Increase and decrease each value by using the center and right-most soft buttons.
Follow these steps to set the torque and angle:
1. Set the direction switch to ‘R’ to tighten. See figure 11 for directional switch. 2. Set the desired torque by pressing the soft push buttons corresponding to the up/down arrow key indicators. When desired torque is displayed, press the left-most soft button corresponding
to the “Right Arrow” to go to the next screen for setting the angle. 3. Set the desired angle by pressing the soft buttons corresponding to the up/down arrow key indicators. When desired angle is displayed, press left-most soft button corresponding to the “Right Arrow” to go to the next screen for setting the release angle. 4. Set the desired release angle by pressing the soft buttons corresponding to the up/down arrow key indicators. When desired release angle is displayed, press left-most soft button corresponding to the “Right Arrow” to go back to main screen with the torque setting.


TORQUE GUN OPERATION


Tightening


1. Set the direction switch to ‘R’ to tighten. See figure 11 for directional switch. 2. Set the desired torque value as described in “Setting Torque and Angle” section. 3. Make sure the torque gun and the reaction arm are in position for tightening. 4. Ensure the reaction arm is squarely against a solid reaction point. 5. Press and hold the power trigger switch while the socket turns. 6. When specified torque is reached, the FLASH GUN will stop, BEEP once and the Green LED
will turn ON.
7. If Release angle is set, the gun will automatically run backwards to the specified angle to release windup from reaction torque.
8. If the FLASH GUN fails to set the torque properly, it will BEEP 4 times and the Red LED turn ON while also showing the error on the display. In case of error, try again by repeating process from Step 3. If error continues, STOP and check for any abnormalities with the FLASH GUN or the nut/bolt being tightened.
9. Release the power trigger switch.
10. If the trigger is released prematurely, the display will show an error and the Red LED will turn ON. In this case, restart tightening process from step 3.
11. The nut is now tight at the current torque setting. Proceed to the next nut.


Tightening with Angle


1. Set the direction switch to ‘R’ to tighten. See figure 11 for directional switch. 2. Set the desired pre-torque and angle values as described in the “Setting Torque and Angle”
section. 3. Follow the steps 3 to 5 for Tightening above. 4. When preset torque is reached, the FLASH GUN will turn the nut in degrees set by the angle. 5. When the specified angle is set, the gun will stop, BEEP once and the Green LED will turn ON. 

Memory Options


By pressing the left-most button and holding it, the memory menu will be displayed. Figure 13 shows the memory options menu. On this menu, you can save the current settings, or load previously stored settings.
There are 8 memory locations for saving and loading both torque and angle settings. Use the up and down arrow keys to choose from the highlighted numbered memory locations. 
Press the left-most button to select the current memory location. Press the corresponding down arrow key button to save the current settings to the selected memory location. To load the contents of the memory location, press the corresponding up arrow key button. To return to main menu without saving/loading, press the left-most button.

Application


It is ideal for Infrastructure and Power generation Industries.


Tuesday, 22 December 2015

Difference Between Torque Wrench and Tensioners

Torque wrenches and bolt tensioners are two of the most common means of tightening large bolts, where high bolt loads are required. Proper bolt tightening is critical to the operation and safety of most mechanical devices. Generally speaking, the heavier or more powerful the piece of equipment, the greater stress the bolts are put under and the more important that the bolts provide sufficient clamping force. In the case of large bolts, hydraulic wrenches, or tensioners are needed to tighten bolts sufficiently to create adequate clamping force.

Bolt Theory

In order to understand the difference between torque wrenches and tensioners, we must start with an understanding of the theory behind bolt operation. These simple mechanical devices operate by providing clamping force to hold two objects together. While in many cases the bolt also provides support to the objects being clamped, its primary purpose is to provide clamping force.
This clamping force is maintained by the spring tension that is inherent in the tightened bolt. In the process of tightening the bolt, it is stretched microscopically. The elasticity of the material used in the bolt’s manufacture causes it to want to return to its original unstretched shape. This spring tension causes the clamping force and together with the friction in the bolt’s threads, works to prevent loosening.
So, ensuring proper clamping force and the maintenance of that clamping force is a function of ensuring that enough spring tension is created in the bolt while tightening it. Both torque wrenches and bolt tensioners work to create this spring tension by stretching the bolt. However, they use different means to accomplish it.

Torque Wrenches

Torque wrenches provide this tension by the amount of rotational force they apply to the bolt. As the force is applied, it the threading draws the nut face and bolt head closer together, stretching the bolt and creating the clamping force. This is the most common form of providing load to a bolt. For high clamping force a large amount of torque is needed; hydraulic wrenches can provide this force.
With hydraulic wrenches, torque is controlled by the hydraulic fluid pressure. The higher the pressure, the more torque is applied to the bolt. As hydraulic fluid doesn’t compress, this provides very accurate and consistent torque values.

Torque has been used as a means for controlling bolt loading and clamping force for many years. Therefore, there are standard torque tables available, which provide guidance for determining the correct amount of torque to be used for a particular size and grade of bolt. For the greatest possible accuracy when specifying torque for a particular application, it is important to take into consideration a number of other factors, all of which can affect the amount of clamping force that a particular amount of torque applies. 
  • The finish used on the bolts
  • Whether or not flat washers are used
  • The number of times that the bolt has been used
  • Cleanliness of the bolt
  • Whether or not a lubricant has been applied to the threads and nut face

Bolt Tensioners

Bolt tensioners work by preloading the bolt, stretching it before the nut is installed. The tensioner is clamped to the bolt’s threads and pushes against the flange in the surface being bolted. This provides a very consistent amount of stretch to the bolt, ensuring consistent bolt stretch and clamping force.

The drawback to bolt tensioners is that they must be selected specific to each application. Much more data must be compiled and considered in the selection of a tensioner; this includes:
  • Bolt diameter
  • Free stud protrusion length
  • Nut size
  • Washer thickness and diameter
  • Bolt grade
  • Bolt load requirement
The amount of bolt stretch is controlled by the hydraulic pressure applied to the tensioner. Since the bolt will be pre-stretched by the tensioner, minimal torque is needed to tighten the nut onto the stud. The necessary clamping pressure or bolt load is accomplished by release of the tensioner, allowing the natural elasticity of the bolt to provide the clamping pressure.

Conclusion

Spirited discussion still rages over whether torque wrenches or bolt tensioners are the better means for tightening heavy bolts to produce high bolt loads. Both tools have their advantages and their disadvantages. It is important to use the method recommended by the manufacturer of a particular piece of equipment, whether torque controlled hydraulic wrenches or tensioners, in order to ensure that the bolts are properly tightened for that application.